Monday 24 September 2012

How to use Google translate in my PC

,
1.Go to your browser "more" and click translate.
2.chose language to translate.

Saturday 22 September 2012

what is difference between square thread and acme thread

,

Advantages & disadvantages

The greatest advantage of square threads is that they have a much higher intrinsic efficiency than acme threads. Due to the lack of a thread angle there is no radial pressure, or bursting pressure, on the nut. This also increases the nut life.[1]
The greatest disadvantage is the difficulty in machining such a thread. The single-point cutting tools or taps and dies used to cut the thread cannot have efficient rake and relief angles (because of the square form), which 
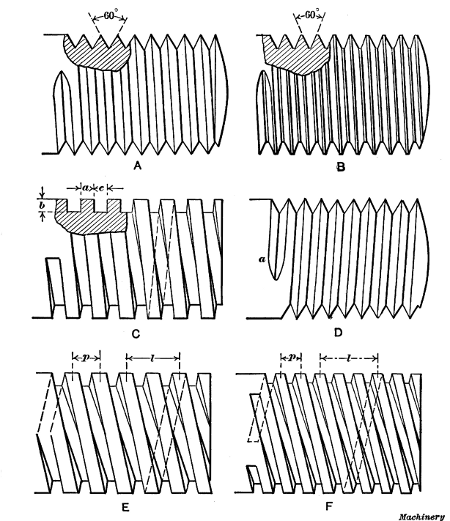
makes the cutting slow and difficult. Square threads also cannot carry as much load as a trapezoidal thread, because the root of the square thread is smaller. Also, there is no way to compensate for wear on the nut, so it must be replaced when worn out.[1]


Wednesday 19 September 2012

How to learn YouTube Download step by step

,
Step 1. Launch Free YouTube Download


Follow Start > All Programs > DVDVideoSoft > Programs > Free YouTube Download or click the DVDVideoSoft Free Studio icon on the desktop.
The interface is self-explaining. There is a field for YouTube links, a field for output settings and the Download button.

Copy as many YouTube links from your Internet browser as you wish and paste them into the program. The program will detect all videos at this link, single YouTube videos as well as whole collections like the following ones:
- complete playlists and show lists;
- users' channels;
- all videos from personal playlists (History, Liked, Favourites, Watch later, etc.);
- artist's playlists;
- videos from Movies Category;
- videos from Music Category;
- videos from YouTube charts;
- video responses.


Step 3. Select Output Format

Choose one of the available Presets: save your videos in original YouTube format or convert them to AVI or MP4 format. Select available pre-configured settings for each format.
For advanced users: read this guide to find information about how to customize a preset or create a new one.
(To enable Preset Editor go to Options => Tab General)


Step 4. Download Video

Click the Download button and wait just a few seconds or several minutes max (depending on your internet connection speed).

Step 5. Find Your Video

Check your videos by clicking the folder which appeared after the download is complete.


How to YouTube Videos in Ubuntu 11.10 with ClipGrab step by step

,
ClipGrab is a free downloader and converter for YouTube, Vimeo, Dailymotion and many other video sites online. It makes downloading and converting online videos easy in Ubuntu as well as in Windows systems. This brief tutorial shows you how to install and use ClipGrab in Ubuntu 11.10 Oneiric Ocelot.

We also showed you how to download YouTube videos using Minitube. To read that post, click here.
Objectives:
  • Install ClipGrab
  • Enjoy!
 To get started, press Ctrl – Alt – T to open Terminal. When it opens, run the commands below to add ClipGrab ppa:
sudo add-apt-repository ppa:clipgrab-team/ppa
oneiric_clipgrab
Next,  run the commands below to update your system.

oneiric_clipgrab_1
 Finally, run the commands below to install ClipGrab

oneiric_clipgrab_2


Tuesday 18 September 2012

How to install easily Android ICS in ASUS Netbook

,
http://www.youtube.com/watch?v=1DqqVP9obu0&feature=player_embedded

What if you could install the Android 4.0 Ice Cream Sandwich operating system on your Netbook?

Good news for Eee PC owners, the Android-x86 project has developed an x86 version of the popular operating system specifically designed for ASUS Netbooks. In the video above you can see Android 4.0 demoed on the ultra-portable Eee PC X101Ch that we unboxedhere last week.

Now we should mention that this is in no way an official release or even something endorsed by ASUS. This version of the Android OS should generally work but the Android-x86 project is still working on adding multi-touch support, external monitors, ethernet support, support for all applications.

But if you want to check out Android and you’ve got a solid back-up DVD of your Netbook somewhere then why not give it a shot?

You can download the OS here (just look for the correct version for your PC):http://www.android-x86.org/download

Startup Repair in Windows 7 step by step

,

Boot From the Windows 7 DVD


Wait for Windows 7 to Load Files


Choose Windows 7 Setup Language and Other Settings


Click on the Repair Your Computer Link


Wait for System Recovery Options to Locate Windows 7 on Your Computer

Sunday 16 September 2012

Saturday 15 September 2012

How to use disk management to format step by step

,
How to use Disk ManagementTo start Disk Management:
Log on as administrator or as a member of the Administrators group.
Click Start, click Run, type compmgmt.msc, and then click OK.
In the console tree, click Disk Management. The Disk Management window appears. Your disks and volumes appear in a graphical view and list view. To customize how you view your disks and volumes in the upper and lower panes of the window, point to Top or Bottom on the View menu, and then click the view that you want to use.NOTE: Microsoft recommends that you create a full back up of your disk contents before you make any changes to your disks or volumes.


How to create a new partition or a new logical driveTo create a new partition or logical drive on a basic disk:
In the Disk Management window, complete one of the following procedures, and then continue to step 2:
To create a new partition, right-click unallocated space on the basic disk where you want to create the partition, and then click New Partition.
To create a new logical drive in an extended partition, right-click free space on an extended partition where you want to create the logical drive, and then click New Logical Drive.
In the New Partition Wizard, click Next.
Click the type of partition that you want to create (either Primary partition, Extended partition, or Logical drive), and then click Next.
Specify the size of the partition in the Partition size in MB box, and then click Next.
Decide whether to manually assign a drive letter, let the system automatically enumerate the drive, or do not assign a drive letter to the new partition or logical drive, and then click Next.
Specify the formatting options you want to use by using one of the following procedures:
If you do not want to format the partition, click Do not format this partition, and then click Next.
If you want to format the partition, click Format this partition with the following settings, and then complete the following procedure in the Format dialog box:
Type a name for the volume in the Volume label box. This is an optional step.
Click the file system that you want to use in the File system box.

You can change the disk allocation unit size, and then specify whether to perform a quick format, or enable file and folder compression on NTFS volumes.Click Next.

Confirm that the options that selected are correct, and then click Finish.The new partition or logical drive is created and appears in the appropriate basic disk in the Disk Management window. If you chose to format the volume in step 6, the format process now starts.


How to format a basic volumeTo format a partition, logical drive or basic volume:
In the Disk Management window, right-click the partition or logical drive that you want to format (or reformat), and then click Format.
In the Format dialog box, type a name for the volume in the Volume label box. This is an optional step.
Click the file system that you want to use in the File system box. If you want, you can also change the disk allocation unit size, specify whether you want to perform a quick format, or enable file and folder compression on NTFS volumes.
Click OK.
Click OK when you are prompted to format the volume. The format process starts.
How to view the properties of a basic volumeTo view the properties of a partition or logical drive:
In the Disk Management window, right-click the partition or logical drive that you want, and then click Properties.
Click the appropriate tab to view the appropriate property.
How to delete a partition or a logical driveTo delete a partition or logical drive:
In the Disk Management window, right-click the partition or logical drive that you want to delete, and then clickDelete Partition or Delete Logical Drive.
Click Yes when you are prompted to delete the partition or logical drive. The partition or logical drive is deleted.Important
When you delete a partition or a logical drive, all the data on that partition or logical drive, and the partition or the logical drive, are deleted.
You cannot delete the system partition, boot partition, or a partition that contains the active paging (swap) file.
You cannot delete an extended partition unless the extended partition is empty. All logical drives in the extended partition must be deleted before you can delete the extended partition.
TroubleshootingDisk Management displays status descriptions in graphical view and under the Status column of list view to inform you of the current status of the disk or volume. Use these status descriptions to help you detect and troubleshoot disk and volume failures. The following is a partial list of disk and volume status descriptions:
Online
This is the normal disk status when the disk is accessible and functioning correctly.
Healthy
This is the normal volume status when the volume is accessible and functioning correctly.
Unreadable
The disk is inaccessible because of possible hardware failure, corruption, or I/O errors.

To troubleshoot this issue, restart the computer or rescan the disk to try and return the disk to Online status. To rescan the disk, open Computer Management, and then click Disk Management. On the Action menu, click Rescan Disks.For a complete list of disk and volume status descriptions and troubleshooting procedures, see Disk Management Help. In the Disk Management snap-in or Computer Management window, click Help on the Action menu.

How to install easily windows server 8 step by step

,

1. Insert the appropriate Windows Server 2008 installation media into your DVD drive.
2. Reboot the computer.


3. When prompted for an installation language and other regional options, make your selection and press Next.


4. Next, press Install Now to begin the installation process.


5. Product activation is now also identical with that found in Windows Vista. Enter yourProduct ID in the next window, and if you want to automatically activate Windows the moment the installation finishes, click Next.


If you do not have the Product ID available right now, you can leave the box empty, and click Next. You will need to provide the Product ID later, after the server installation is over. Press No.


6. Because you did not provide the correct ID, the installation process cannot determine what kind of Windows Server 2008 license you own, and therefore you will be prompted to select your correct version in the next screen, assuming you are telling the truth and will provide the correct ID to prove your selection later on.


7. If you did provide the right Product ID, select the Full version of the right Windows version you're prompted, and click Next.


8. Read and accept the license terms by clicking to select the checkbox and pressing Next.


9. In the "Which type of installation do you want?" window, click the only available option –Custom (Advanced).


10. In the "Where do you want to install Windows?", if you're installing the server on a regular IDE hard disk, click to select the first disk, usually Disk 0, and click Next.


11. The installation now begins, and you can go and have lunch. Copying the setup files from the DVD to the hard drive only takes about one minute. However, extracting and uncompressing the files takes a good deal longer. After 20 minutes, the operating system is installed. The exact time it takes to install server core depends upon your hardware specifications. Faster disks will perform much faster installs… Windows Server 2008 takes up approximately 10 GB of hard drive space.


The installation process will reboot your computer, so, if in step #10 you inserted a floppy disk (either real or virtual), make sure you remove it before going to lunch, as you'll find the server hanged without the ability to boot (you can bypass this by configuring the server to boot from a CD/DVD and then from the hard disk in the booting order on the server's BIOS)


12. Then the server reboots you'll be prompted with the new Windows Server 2008 type of login screen. Press CTRL+ALT+DEL to log in.


13. Click on Other User.

14. The default Administrator is blank, so just type Administrator and press Enter.

15. You will be prompted to change the user's password. You have no choice but to press Ok.

16. In the password changing dialog box, leave the default password blank (duh, read step #15…), and enter a new, complex, at-least-7-characters-long new password twice. A password like "topsecret" is not valid (it's not complex), but one like "T0pSecreT!" sure is. Make sure you


.


How to configure my windows 7 IP address automatically

,
1.Open Network Connections by clicking the Start button , and then clickingControl Panel. In the search box, type adapter, and then, under Network and Sharing Center, click View network connections.


2.Right-click the connection that you want to change, and then click Properties. If you're prompted for an administrator password or confirmation, type the password or provide confirmation.


3.Click the Networking tab. Under This connection uses the following items, click either Internet Protocol Version 4 (TCP/IPv4) or Internet Protocol Version 6 (TCP/IPv6), and then click Properties.


4.To get IP settings automatically using DHCP, click Obtain an IP address automatically, and then click OK.

How to connect to a shared folder in windows step by step

,
When you share a folder, you can give it a share name, provide comments to describe the folder and its content, control panel, control the number of users who have access to the folder, assign permissions, and create multiple share names for the folder.

To share a folder, complete the following steps:
1. Log on with a user account that is able to share folder.
2.Right-click the folder that you want to share, and them click properties.
3.On the sharing tab of the properties dialog box, click share this folder and configure.

Friday 14 September 2012

windows 8 all version with key download free

,

ISO images

An ISO image must be converted into installation media stored on a DVD or a USB flash drive. Instructions are provided on this page. Developer tools are available for download from Windows Dev Center.
Important: If you decide to go back to your previous operating system, you'll need to reinstall it from the recovery or installation media that came with your PC, which is typically DVD media. If you don’t have recovery media, you might be able to create it from a recovery partition on your PC using software provided by your PC manufacturer. Check the support section of your PC manufacturer’s website for more information. After you install Windows 8, you won’t be able to use the recovery partition on your PC to go back to your previous version of Windows

English

64-bit (x64)                    Download (3.3 GB)                    Sha 1 hash — 0xD76AD96773615E8C504F63564AF749469CFCCD57

32-bit (x86)                    Download (2.5 GB)                    Sha 1 hash — 0x8BED436F0959E7120A44BF7C29FF0AA962BDEFC9

Product Key:   TK8TP-9JN6P-7X7WW-RFFTV-B7QPF


System Requirements

Windows 8 Release Preview works great on the same hardware that powers Windows 7:
  • Processor: 1 gigahertz (GHz) or faster
  • RAM: 1 gigabyte (GB) (32-bit) or 2 GB (64-bit)
  • Hard disk space: 16 GB (32-bit) or 20 GB (64-bit)
  • Graphics card: Microsoft DirectX 9 graphics device with WDDM driver
Additional requirements to use certain features:
  • To use touch, you need a tablet or a monitor that supports multitouch.
  • To access the Windows Store and to download and run apps, you need an active Internet connection and a screen resolution of at least 1024 x 768.
  • To snap apps, you need a screen resolution of at least 1366 x 768.
  • Internet access (ISP fees might apply)

Thursday 13 September 2012

Using regional and language settings on windows 7

,
1.The Regional and language setting link (equivalent file-name -"intl.cpl") allows you to modify various regional settings setting, for instance:
 
2.click ok.

Ø  The way numbers are displayed (e.g. decimal separator).
Ø  How currency values are displayed, including the currency sign.
Ø  Time and date notations, such as the date separator and whether the clock should be in 12 or 24 hours.
Ø  Cultural location of the user’s computer (the time zone is set in date and time).
Ø  Language  

1. Input language.
2. Keyboard layout (mapping between key strokes and characters).
3. Display language for menus and dialog Boxes.   
4. Whether files necessary for Asian language support must be installed.     
5. Installed code page.

The following figure shows displays the Regional and Language option dialog box: 

 6.Apply ok.

How to change password easily my Gmail account

,
1.Go to Gmail Setting and click "Account and import"

2.Change password.

3.type current password (old password ) again current password
which you chose and confirm new password.

4. click save.


Wednesday 12 September 2012

How to fast my google chorme browsing speed

,
Go to tool "option"

2.select the "Enable instant for faster searching"


Tech-features Copyright © 2011 -- Template created by SONU XRT -- Powered by XRTBLOG Templates